数据治理之读写分离
盘古开发框架集成了数据库中间件 ShardingSphere 来提供数据治理相关功能。如:读写分离、数据分片、数据加密等。
读写分离概念
随着业务系统日益增加的系统访问量,数据库的吞吐量往往成为系统并发的性能瓶颈。对于同一时刻有大量并发读操作和较少写操作类型的应用系统来说,将数据库拆分为主库和从库搭架主从集群,由主库负责处理事务性的增删改操作,从库负责处理查询操作,能够有效的避免数据更新导致的行锁,从而一定程度提升整个系统的读写并发性能。如下图所示。
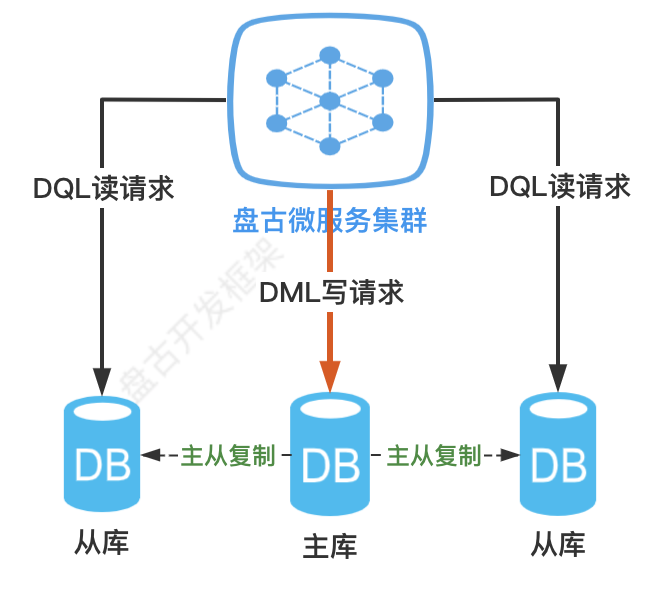
目前支持一主一从或一主多从的主从集群架构,不支持多主写的架构。对于多从的架构可根据路由算法做读负载均衡,以将查询请求均匀的分散到多个数据副本。(数据库主从架构搭架不在本文讨论范围之内)
读写分离后面临的问题
对于一般的简单理解,读写分离就是 DQL 请求走从库,DML 请求走主库。但对于开发人员而言,在实际开发中还需要考虑如下问题。
主从数据同步延迟问题
因为我们主从同步是异步复制的,不可避免的会有延迟。因此有可能出现 mastre 节点已经写入,但是从 slave 节点读取不到数据的问题。解决方法见后续测试用例章节:读操作强制走主库和事务方法里的所有读写操作都自动走主库。事务问题 如果一个事务方法里既包含有 DML 请求也有 DQL 请求,如果读请求走从库写请求走主库的话,则势必会带来分布式事务的问题。但对于大部分读写分离场景而言,很显然我们并不希望为了读写分离而去处理分布式事务的问题。因此对于读写分离,恰当的做法是将事务方法中的所有 SQL 请求统一都走主库,将跨库的分布式事务转为本地事务来处理。见后续测试用例章节:事务方法里的所有读写操作都自动走主库。(如果对于分布式场景下的分布式事务问题的处理感兴趣,可以参考:盘古框架分布式事务最佳实践)
相关专业术语
- 主库:数据 DML 写操作(insert、update、delete)使用的数据库。仅支持单主库。
- 从库:数据 DQL 读操作(select)使用的数据库。可支持多从库。
- 主从同步:将主库数据同步到从库的操作。依赖数据库自身的同步机制,比如:MySQL 基于 binlog 的异步复制。
读写分离实现原理
实现读写分离大致有 3 种方案。如下图所示。
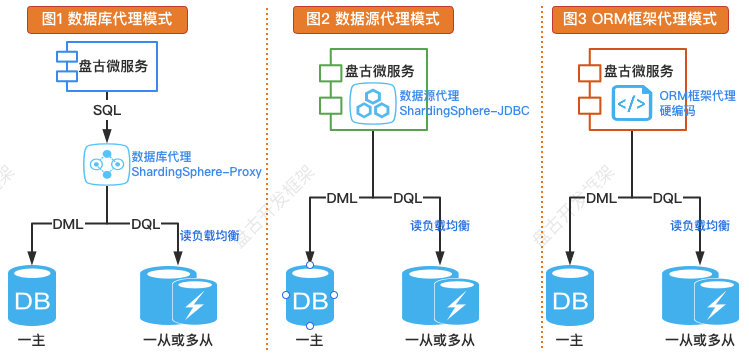
数据库代理模式(服务端代理)
在数据库和应用系统之间独立部署一个数据库代理中间件,所有的 SQL 请求先发送到这个代理,由它完成 SQL 解析、SQL 路由等必要操作。在这种模式下,路由规则都配置到代理上,读写分离的逻辑对开发人员是透明的。数据源代理模式(客户端代理)
通过在应用端引入组件包,代理应用普通数据源。在这种模式下,路由规则配置到应用侧,所有 SQL 请求都通过代理数据源完成 SQL 解析、SQL 路由等必要操作。ORM 框架代理模式(客户端代理)
通过 ORM 框架(Hibernate、Mybatis 等)的插件、拦截器机制实现。这只能算是特定环境下的一种实现方法,不能作为一套完整的标准化解决方案。故在此不做更多描述。
实现方式 | 可选组件 | 优点 | 缺点 |
|---|---|---|---|
| 数据库代理模式 | ShardingSphere-Proxy MyCat | 多语言支持 独立部署(升级简单) 对开发完全透明 | 独立部署(增加不稳定因素) 运维成本高 性能损耗高 |
| 数据源代理模式 💋 | ShardingSphere-JDBC | 集成简单、轻松驾驭 性能较好 | 嵌入 JAR(升级麻烦) 日常数据维护麻烦 |
| 自研/硬编码 | 硬撸一时爽 | 事后火葬场 |
盘古开发框架使用 ShardingSphere-JDBC 组件,通过数据源代理的方式实现读写分离功能。
编程实战
本实例以一主二从的数据库主从集群为例,来演示如何基于盘古框架开发一个读写分离且支持读负载均衡的范例程序。
初始化数据库环境
create table t_order
(
    order_id bigint auto_increment primary key,
    user_id  int         not null,
    status   varchar(50) null
)
    comment '订单表';
根据上述脚本,再创建从库 1 和 从库 2 的 t_order 表。(仅演示读写分离效果,不搭建真实主从复制集群,可手工插入从库所需测试数据)
安装相关盘古模块
- 盘古 Parent
- 基础模块
- JDBC 模块
- 数据治理模块
<parent>
    <groupId>com.gitee.pulanos.pangu</groupId>
    <artifactId>pangu-parent</artifactId>
    <version>latest.version.xxx</version>
    <relativePath/>
</parent>
<dependency>
    <groupId>com.gitee.pulanos.pangu</groupId>
    <artifactId>pangu-spring-boot-starter</artifactId>
</dependency>
<dependency>
    <groupId>com.gitee.pulanos.pangu</groupId>
    <artifactId>pangu-jdbc-spring-boot-starter</artifactId>
</dependency>
<dependency>
    <groupId>com.gitee.pulanos.pangu</groupId>
    <artifactId>pangu-data-governance-spring-boot-starter</artifactId>
</dependency>
本地配置
为便于理解,本文基于本地配置的方式编写。若改为标准的 Nacos 配置中心模式,请参阅:配置中心章节。
spring.application.name=pangu-examples-shardingsphere-readwrite-splitting

mybatis-plus.mapperLocations=classpath*:/mapper/**/*.xml
mybatis-plus.configuration.log-impl=org.apache.ibatis.logging.stdout.StdOutImpl

# print shardingsphere Actual SQL log
spring.shardingsphere.props.sql-show=true
spring.shardingsphere.datasource.names=ds-master,ds-slave-1,ds-slave-2

# 主库数据源配置
spring.shardingsphere.datasource.ds-master.type=com.zaxxer.hikari.HikariDataSource
spring.shardingsphere.datasource.ds-master.driver-class-name=com.mysql.cj.jdbc.Driver
spring.shardingsphere.datasource.ds-master.jdbc-url=jdbc:mysql://localhost:3306/pangu-examples
spring.shardingsphere.datasource.ds-master.username=root
spring.shardingsphere.datasource.ds-master.password=123456

# 从库 1 数据源配置
spring.shardingsphere.datasource.ds-slave-1.type=com.zaxxer.hikari.HikariDataSource
spring.shardingsphere.datasource.ds-slave-1.driver-class-name=com.mysql.cj.jdbc.Driver
spring.shardingsphere.datasource.ds-slave-1.jdbc-url=jdbc:mysql://localhost:3306/pangu-examples-0
spring.shardingsphere.datasource.ds-slave-1.username=root
spring.shardingsphere.datasource.ds-slave-1.password=123456

# 从库 2 数据源配置
spring.shardingsphere.datasource.ds-slave-2.type=com.zaxxer.hikari.HikariDataSource
spring.shardingsphere.datasource.ds-slave-2.driver-class-name=com.mysql.cj.jdbc.Driver
spring.shardingsphere.datasource.ds-slave-2.jdbc-url=jdbc:mysql://localhost:3306/pangu-examples-1
spring.shardingsphere.datasource.ds-slave-2.username=root
spring.shardingsphere.datasource.ds-slave-2.password=123456

# 读写分离策略配置
spring.shardingsphere.rules.readwrite-splitting.data-sources.pangu-rws.type=Static
# 写数据源配置
spring.shardingsphere.rules.readwrite-splitting.data-sources.pangu-rws.props.write-data-source-name=ds-master
# 读数据源配置
spring.shardingsphere.rules.readwrite-splitting.data-sources.pangu-rws.props.read-data-source-names=ds-slave-1,ds-slave-2
# 读负载均衡算法配置
spring.shardingsphere.rules.readwrite-splitting.load-balancers.read-random.type=RANDOM
测试用例
启动类
@EnableTransactionManagement
@SpringBootApplication
public class ReadWriteSplittingApplication {
    public static void main(String[] args) {
        PanGuApplicationBuilder.init(ReadWriteSplittingApplication.class).run(args);
    }
}
测试写操作自动走主库
@Test
public void writeRoute() {
    TOrderEntity entity = new TOrderEntity().setUserId(1).setStatus("测试");
    tOrderMapper.insert(entity);
}
测试读操作自动走从库负载均衡
@Test
public void readRoute() {
    tOrderMapper.selectById(1508317805991194627L);
    tOrderMapper.selectById(1508317805991194628L);
}
测试读操作强制走主库
@Test
public void readByWriteRoute() {
    HintManager hintManager = HintManager.getInstance();
    hintManager.setWriteRouteOnly();
    try {
        log.info("查询数据(强制走主库)...");
        TOrderEntity entity = tOrderMapper.selectById(2L);
        log.info("查询结果 {}", entity);
    } finally {
        hintManager.close();
    }
}
测试事务方法自动走主库
事务方法里的所有读写操作都自动走主库。
@Test
@Transactional(rollbackFor = RuntimeException.class)
public void doWithTransaction() {
    log.info("插入数据...");
    TOrderEntity entity = new TOrderEntity().setUserId(1).setStatus("测试");
    tOrderMapper.insert(entity);
    log.info("查询数据(事务方法内所有请求自动走主库)...");
    tOrderMapper.selectById(1L);
}
本文相关范例源码
下一步
继续阅读其它章节获取你想要的答案或通过我们的 开发者社区 寻求更多帮助。